How to Draw a Room in Perspective
Here is how to draw a room in perspective: start with the back wall as a rectangle. Put one vanishing point inside it at eye level, and pull lines from the wall's corners through the edges of the page. Those four lines become the floor, ceiling and side walls, and a perspective grid keeps everything else lined up as simple boxes.
In short
- Facing the back wall? Use one-point. Looking into a corner? Use two-point.
- The vanishing point sits on the horizon at the viewer's eye height.
- Draw furniture as boxes first, using the floor grid to place them.
- Doors and windows follow the same rays as the walls they sit on.
One-point room, step by step
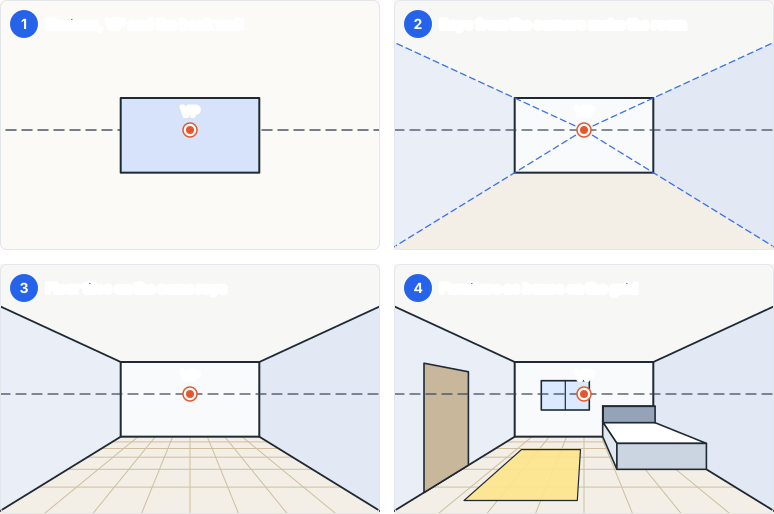
- Set the horizon and back wall. Draw the back wall as a rectangle. Put the horizon across it at eye level and mark a single vanishing point on the horizon.
- Pull the walls out. From each corner of the back wall, draw a line from the vanishing point through the corner to the edge of the page. These are the floor, ceiling and side-wall edges.
- Lay a floor grid. Divide the back wall's bottom edge into equal parts and run each division to the vanishing point. Add cross lines that get closer together toward the back.
- Block in furniture. Draw each piece as a box sitting on the grid: bottom edges follow the grid, verticals stay vertical, front edges stay horizontal.
- Add doors, windows and details. Windows on the back wall are plain rectangles. Doors on side walls use lines to the vanishing point for their top and bottom.
- Clean up. Lighten or remove construction lines and keep the room edges you want in the final drawing.
The finished layout
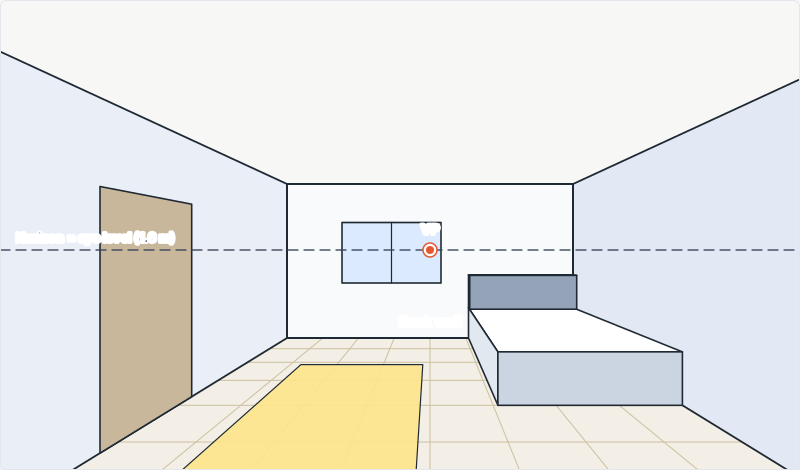
Notice how the window on the back wall stays a plain rectangle: it is parallel to the picture plane. The door on the side wall is foreshortened because that wall runs toward the vanishing point. The rug is a flat rectangle on the floor grid, and the bed is two stacked boxes.
Where to put the vanishing point
- Standing view: about two-thirds up the back wall for an adult in a normal room.
- Seated view: lower, around the height of a tabletop.
- Off-centre: shifting the point left shows more of the right wall, and vice versa. Use this to feature one side of the room.
When to switch to two-point
If the viewer looks into a corner rather than at a wall, two walls recede in two directions. That needs two vanishing points on the same horizon. The method is in two-point room interiors.
Common room mistakes
- Leaning furniture: only depth edges go to the vanishing point; verticals stay upright.
- Moving the horizon: keep it fixed for the whole drawing.
- Flat-looking room: make sure the back wall is clearly smaller than the near opening and that tile rows get closer together with depth.
- Giant or tiny furniture: compare heights against the horizon. A bed is well below eye level; a standing person's eyes are on it.
Use a perspective grid while you draw
A perspective grid is the scaffold under this lesson. Open the one-point room perspective grid on the free generator, or start from the homepage perspective grid and switch to one-point yourself. Set the horizon near eye level, export a transparent PNG or SVG, and draw the back wall on top of those rays. When the corner view is clearer, switch to the two-point room preset and keep both vanishing points on the same horizon.
Return to the perspective grid tutorial hub for fundamentals, hallways, buildings and software guides. This room page is one stop on that index: same vocabulary, a concrete interior, and a practise button that loads the matching grid. If a line looks wrong, compare it with the generator instead of inventing a new vanishing point mid-drawing.
Common checks while the perspective grid is visible: the horizon stays fixed; only depth edges travel to the vanishing point; verticals of doors, windows and furniture stay upright; floor tiles get closer together as they recede. Hide the grid for the final pass so the room reads as architecture, not as construction.
If you are teaching or studying, print the vector PDF and trace once by hand. Then rebuild the same room from memory and overlay the perspective grid again to score your vanishing point. That loop—guide, draw, hide, check—is faster than reading extra theory. For feedback on a diagram or a missing step, write via the contact page.
Floor grid, furniture and scale
Once the back wall and four corner rays exist, the floor grid is what makes a room perspective grid useful. Divide the bottom of the back wall into equal segments—tiles, floorboards or rug units—and send each division to the vanishing point. Cross lines that mark depth should sit closer together as they approach the back wall. If those rows stay evenly spaced, the floor reads as a pattern pasted on the picture plane instead of a surface receding in space.
Place furniture as boxes before you add legs, cushions or moulding. A bed is a low box plus a thinner mattress box; a wardrobe is a tall box against a wall; a table is a box whose top sits well below the horizon for a standing viewer. Bottom edges follow the floor grid, vertical edges stay vertical, and the front face of a one-point box stays a true rectangle because it is parallel to the picture plane. Side faces taper toward the vanishing point.
Scale comes from the horizon, not from how large you wish an object to look. A standing adult's eyes sit on the horizon. A seated person's eyes sit lower. A bed, chair and low table live below eye level; a tall bookcase may cross the horizon. If a chair looks giant, its seat is probably too close to the horizon or its footprint ignores the tile grid. Redraw the footprint first, then raise verticals to a believable height.
Doors and windows obey the wall they belong to. A window on the back wall is a rectangle: its sides are vertical and its top and bottom are horizontal. A door on a side wall is foreshortened: its top and bottom run to the same vanishing point as the ceiling and floor of that wall, while its hinge side and latch side stay vertical. The same rule covers picture frames, skirting boards and ceiling beams.
Two-point room perspective, in practice
Switch to two-point when the viewer looks into a corner rather than straight at a wall. You now have two walls receding in two directions and no back wall parallel to the picture plane. Put both vanishing points on one horizon, far enough apart that the corner does not pinch. Draw the vertical corner where the walls meet, then send the floor and ceiling of the left wall to the left vanishing point and the right wall to the right vanishing point.
The generator's two-point room preset is a starting perspective grid, not a finished interior. Drag the handles if the corner feels too close to the edge of the page. Keep the horizon at eye height for the story you are telling—standing, seated, or a child's view. Tile the floor by dividing each wall's base and using measuring points or consistent spacing so squares do not become random trapezoids. Furniture still begins as boxes; each box now has two sets of depth edges, one toward each vanishing point, and no face that stays a perfect rectangle unless you deliberately add a picture-plane object.
A reliable sequence is: horizon, two vanishing points, corner vertical, wall tops and bases, floor grid, then the largest furniture masses, then doors and windows, then small objects. If you jump to lamps and cushions first, errors in the corner compound and the room will not sit. Compare your sketch with the two-point room interior lesson when that page is live, and with the one-point steps above when you only need a wall-facing view.
Export the grid and draw over it
From the perspective grid generator, export PNG when you want a transparent layer in a painting app, SVG when you want to edit strokes, or vector PDF when you want to print. Drop the export under your line art at low opacity. Trace the back wall or the corner, then build furniture using the same rays. Turn the guide off for the last pass so construction does not compete with the drawing.
Paper works the same way. Print the PDF, tape it under thin paper or use a lightbox, and pencil the room lightly. Alternatively, draw the perspective grid by hand from the lesson steps and only use the export to check your vanishing point. Either path is valid. The point of this room perspective tutorial is the repeatable construction, not a dependency on one file format.
When you want the wider catalogue—ellipses, figures, roofs, or app-specific rulers—go back to the perspective grid tutorial hub. Keep this URL for the interior method. If a diagram disagrees with what you see in the tool, or you want another room example, use the contact page and describe the step number and the mode you had open.
Open the free perspective grid on the homepage, switch to one-point or two-point, and draw your next room over the export. That loop—read this guide, open the tool, export—is the closed path from tutorial back to the generator.
Frequently asked questions
Is there a room perspective generator?
Yes — the perspective grid generator can set up the guide lines for a room. Choose 1-point for a straight-on view or 2-point for a corner, set the horizon to eye level, and export a transparent PNG or SVG to draw over.
How do I draw a room in two-point perspective?
Place two vanishing points far apart on the horizon, draw the vertical corner where the two walls meet, and run the floor and ceiling lines of each wall to its own vanishing point.
How high should the horizon be in a room drawing?
At the viewer's eye height: about 1.5–1.7 m for a standing adult, about 1.1–1.2 m when seated.