Free guides · 27 tutorials live
Perspective Grid Tutorial Hub
These drawing guides teach vanishing-point construction from the horizon line to fisheye layouts. Each guide pairs clear diagrams with a button that opens a matching setup in the free perspective grid generator, so you can practise on a real grid instead of guessing construction lines. Start with fundamentals, move into one- and two-point room interiors and buildings, then explore 3-point and five-point views when you need height or a wide lens. The live featured lesson is the room walkthrough; a dedicated three-point article will join this hub when it publishes—until then the homepage Mode control already opens a full 3-point grid. New lessons publish on a steady schedule; everything already live stays free, with no account and no watermark on exports.
What a perspective grid tutorial should teach
A good perspective grid tutorial does more than name vanishing points. It shows where the horizon sits relative to the viewer, how rays from each vanishing point organize space, and how boxes become rooms, corridors, streets and towers. You learn to keep verticals upright in one- and two-point scenes, to place a third vanishing point only when you look up or down, and to read depth from spacing that tightens toward the distance. The same habits transfer to sketchbooks, tablets and desktop painting apps.
On this hub every guide is written for working artists and students. We avoid decorative theory that never reaches the page. Instead you get a short goal, a sequence you can redraw, mistakes to watch for, and a practise link into the generator. When a lesson needs a room, hallway or building layout, the matching preset loads horizon height and vanishing-point positions so the on-screen grid agrees with the diagrams.
Use the hub as an index, not a wall of text you must finish in one sitting. Bookmark the start path if you are new. Jump straight to rooms if you already understand one-point basics. Return when you need ellipses, figures, slopes or software-specific rulers. The structure below mirrors how most people actually learn: vocabulary first, then one vanishing point, then two, then height and curvature.
How to practise with the free perspective grid generator
Open the free perspective grid tool beside any lesson. Switch among 1-, 2-, 3- and 5-point modes, drag vanishing-point handles, and tune spacing until the density matches your subject. Export a transparent PNG to draw over in Procreate, Photoshop, Clip Studio Paint or Krita; export SVG or vector PDF when you want editable guides or printouts. Nothing is uploaded—the grid stays in your browser.
A practical workflow for each guide looks like this: read the overview, open the suggested preset, redraw the first construction on paper or on a layer above the export, then compare your lines with the diagram. If furniture looks giant or tiny, check it against the horizon. If walls lean, confirm that only depth edges travel to a vanishing point. If the room feels flat, push the back wall smaller and tighten floor divisions with depth.
For interiors, try the room presets linked from the featured guide below. For exteriors, start with two-point buildings and keep vanishing points far apart so foreshortening stays gentle. For dramatic height, move to three-point only after one- and two-point feel automatic. For ultra-wide or curvilinear views, use the five-point fisheye grid and accept that straight world lines become curves on the page.
Featured room perspective tutorial
If you want a complete interior workflow today, start with the pinned guide: room perspective generator — how to draw a room step by step. It walks through a one-point room—back wall, floor grid, door, window and bed—then explains when to switch to two-point for a corner view. The lesson links back here and to the generator so you can open a one-point room grid, export it, and draw over the same construction the diagrams show.
That room perspective tutorial is the best first deep dive after you know what a horizon and a vanishing point are. It stays concrete: every object begins as a box on the floor grid, verticals stay vertical, and furniture height is judged against eye level. When you finish, you can reuse the same method for hallways, classrooms and simple stage sets.
New to perspective? Start here
A short reading order. Unpublished titles appear when their publish date arrives; live links open immediately.
One-, two-, three- and five-point paths
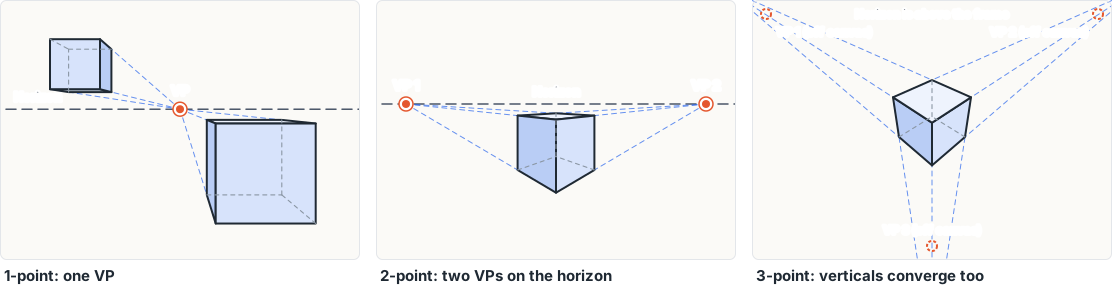
One-point suits scenes that face a wall, road or corridor head-on. A single vanishing point sits on the horizon; width and height stay parallel to the picture plane. Rooms, railways and hallways belong here.
Two-point fits corners and building exteriors. Two vanishing points share one horizon; verticals remain upright. Keep the points wide on the page so boxes do not distort.
Three-point adds a vertical vanishing point when you look up at a tower or down over a city. Use it for drama, not for every sketch. The free generator already supports a 3-point perspective grid mode today; a dedicated three-point tutorial will appear in this hub when its publish date arrives—until then treat 3-point as a tool capability with room and building lessons covering planar setups first.
Five-point (fisheye) curves lines toward a circular frame for very wide views. Learn planar perspective first so you can tell intentional curve from accidental lean.
Each category below groups lessons by that path. Software and printing guides show how to carry a grid into Procreate, Clip Studio Paint, Photoshop, Krita or onto paper with a lightbox.
Perspective Fundamentals
The vocabulary and rules every perspective drawing is built on.
One-Point Perspective
One vanishing point: rooms, corridors, roads and railways.
Two-Point Perspective
Two vanishing points: buildings, corners and interiors.
Three-Point Perspective
Looking up and looking down: towers and aerial views.
Curvilinear & Fisheye
Four- and five-point grids for very wide views.
Techniques & Construction
Spacing, ellipses, figures, slopes and reference photos.
Software & Printing
Procreate, Clip Studio Paint, Photoshop, Krita and paper.
Drawing tutorial FAQ
Do I need an account to follow these tutorials?
No. The site and the generator are free to use in the browser. Export PNG, SVG or PDF without signing up. Optional contact mail is only for feedback, not for access.
Which lesson should I open first?
If you are new, follow the start path when those pages are live, or begin with the room perspective guide after you understand a single vanishing point. If you already draw in two-point, skip ahead to buildings, figures or ellipses.
How does a tutorial connect to the generator?
Most lessons include a “practise” button that opens a preset on the homepage perspective grid—for example a one-point room horizon or a two-point corner. Adjust handles, export, and draw over the guide in any app or on printed paper.
Are more drawing guides coming?
Yes. Fundamentals, techniques and software guides publish on a fixed calendar. This hub and the sitemap update when each piece goes live, so you can return for new diagrams without hunting for links.
Can I use the grids commercially?
The generator is a free drawing aid. Your artwork remains yours. For site terms and privacy details, see the Company links in the footer. For product questions or tutorial corrections, use the contact page.
Study tips that transfer to every lesson
Redraw, do not only read. A construction lesson sticks when your hand repeats the steps. Keep the horizon locked for an entire scene. Measure furniture and figures against eye level. Place vanishing points with enough separation that boxes stay readable. When something looks wrong, check whether a line that should be vertical has drifted toward a vanishing point.
Alternate between tool and paper. Export a light grid, sketch confidently, then hide or delete the guide. Try the same room from a seated horizon and a standing horizon. Compare one-point and two-point versions of a corner. These small experiments teach faster than memorizing vocabulary alone.
Finally, treat this hub as a studio shelf: pull one guide, practise with the generator, and file the export with your sketch. Progress compounds when each session ends with a finished box, room or street rather than a half-read article.